| .vscode | ||
| docs | ||
| NUC123 | ||
| picolibc | ||
| src | ||
| .clang-format | ||
| .gitignore | ||
| flash.cmd | ||
| GCC.mk | ||
| generic.mk | ||
| Makefile | ||
| README.md | ||
| run.cmd | ||
TASOLLER Custom Firmware (Host MCU - Application ROM)
See Development for development information.
Like what you see? Buy me a coffee
Features
- Superior slider processing; no more dropped holds or missed notes!
- Native arcade IO support
- Air sensor anti-jitter (fixes dodgy sensors)
- Intuitive menus
- Arcade-accurate colours
And of course, it's all open source :).
Setup
Installing Firmware
- Download both
host_aprom.binandled_aprom.bin - Run
TASOLLER-FirmwareUpdater.exe - Follow the instructions
Configuring segatools
This firmware emulates arcade IO. As such, segatools' emulation should be disabled, by adding the following lines:
[slider]
enable=0
[io4]
enable=0
Ensure no other [slider] section exists in the file (or if it does, set enable=0 there instead).
The slider MUST be assigned to port COM1. To do this:
- Go to
Devices and Printersin control panel - Double click
TASOLLER - In the
Hardwaretab, double clickUSB Serial Device- If this already reads
USB Serial Device (COM1)nothing needs done
- If this already reads
- Click
Change settings - Go to
Port Settings->Advanced... - Under the dropdown for
COM Port Number:selectCOM1
If COM1 is already in use, check what device it is assigned to in Device Manager under Ports (COM & LPT). You may need to enable View -> Show hidden devices.
Pre-chusan Chunithm uses IO3. This firmware does not (and unfortunately cannot) support IO3. It is recommended to enable the HID keyboard mode, and continue to use keyboard input for IRs.
Controls
General
Tap FN1 to insert a coin. FN2 is currently unbound.
Configuration
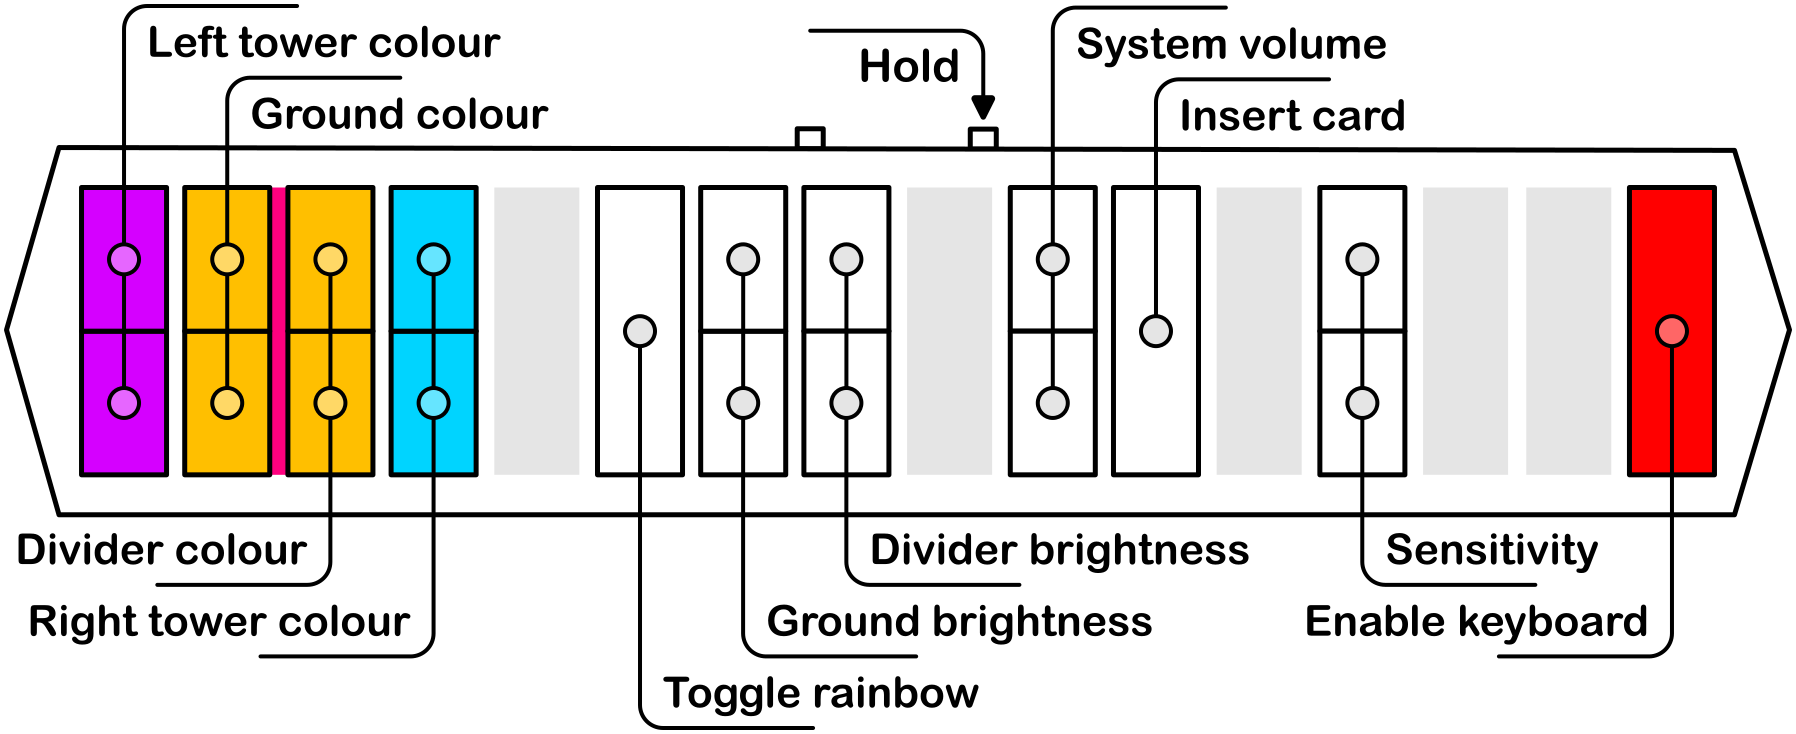
While holding FN1, the following configuration options are available:
※ "Insert card" will hold the Enter key for 5 seconds
Test menu
To enter the system test menu, double-tap FN2. This will mirror the on-screen controls, and additionally adds controls for the TEST and SERVICE buttons on a real cabinet. Double-tap FN2 again to leave this mode on the controller (note that this is not synced with the game exiting the menu!).
To access the TEST and SERVICE buttons without entering the test menu, hold FN2 instead.
Keyboard Mapping
When the HID keyboard is enabled, the following mapping (UMIGURI defaults) is used:
with the airs mapped as 0OLP,..
Please note that this is slightly different to stock firmware!


